Computer Softwares
 Colors play an important role in human lives. Unlike animals, we see and interpret colors of different hues, shades, tints and spectrum. Emotions are attached to different colors ; phrases have been coined around them. Sample a few: Seeing Red, Going Green With Envy, Having The Blues, In The Pink Of Health, Green Thumb.
 You wouldn't go to a doctor who had never been to medical school, or hire a lawyer who never studied law. One side-effect of a world advancing as rapidly as ours is that fields are becoming more and more specialized and narrow. People can no longer get by on general knowledge in their careers, something I found out for myself not too long ago. I'd been out of high school for two years, scraping by on my own and picking up scraps of programming as I went. I saw all of the self-taught programmers breaking into the IT industry, and I hoped to do the same. After all, IT is one of the few industries out there where being creative and a quick learner is more important than a degree.
.jpg) A faster pace of life has imposed some new habits. Instead of reading books, it's easier and faster to watch a movie, long letters have been replaced by text messages ... The situation is similar with pictures.
A faster pace of life has imposed some new habits. Instead of reading books, it's easier and faster to watch a movie, long letters have been replaced by text messages ... The situation is similar with pictures.  If you're like myself, you would easily come to a realization that web compatible fonts are down-right dull for content and even more so for content headlines. People have come up with many ingenious ways to counter this problem. However, each of these methods has its downside. Remember the most important aspect of Google Web Fonts; they not only look good, but they are just fonts to the search engines that spider your website.
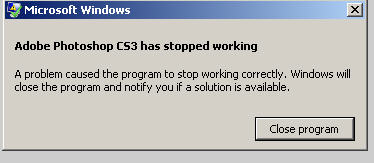 ...however, I soon discovered that Photoshop CS3 would freeze and crash the system whenever I attempted to save a file, even though it would function perfectly normally in every other way. I would have reported this as a blog post to 'rebut' the installation trick, except that it made absolutely no sense that the problem should be related to the installation and, additionally, I had received messages from others that had used the registry hack to successfully install CS3 under XP SP1 and were having no problems.
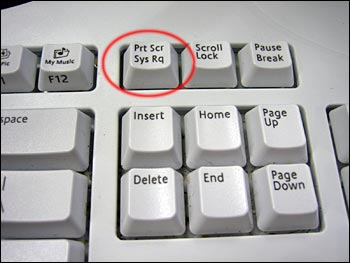 There is a common misconception amongst many computer enthusiasts that they need some $50 gizmo software to take screenshots. However, that's far from truth. The fact is that your computer is fully capable of creating screenshots all on its own with needing to spend any money, or install some software to achieve this goal. That said, a quality screenshot software may add some neat options to taking screenshots that you may not already have.
 This tutorials shows you how to create transparent GIFs in Photoshop 5. This tutorial assumes you already know about layers in Photohop. The basic process involves creating a new image, coloring the background layer a solid color, and making your graphics on other layers. You then change the graphics mode and export the file to GIF format.
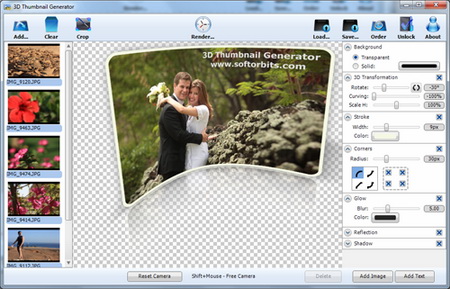 Thumbnail is a reduced display based on which you can have insight in the content that is represented through it. In the last century, more precisely the 80', the thumbnail became a term that refers to a preview of a graphic format on computers. The 3D Thumbnail Generator will make sure that your thumbnails are not just a copies of the original in very small form.
 One famous saying says that programmers are machines that turn caffeine from coffee and Coca Cola into a programming code. And if you ask a programmer when does he like working the most and when is he most productive - he is probably going to say late at night or early in the morning, that is when he has the greatest energy and concentration to work.
 This is a very simple tutorial showing the readers how to add a motion blur affect to your pics. It's something I would recommend for a total beginner of PhotoShop as well.
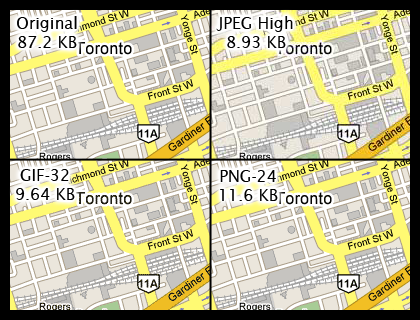 Here is a little insight that one ought to have when it comes to graphics on the web. Learn the difference between JPEG, GIFs, and PNG file formats. It could come handy someday so check it out.
 In the following article we are going to talk about Ligatures and OpenType typography in Word. While you can explore the Advanced properties and OpenType font behavior with the Font window opened, watch out for the ligatures that show up in the second appearance of the word Office on the image...
 InDesign is actually the successor to the Adobe PageMaker that the company Adobe bought from Aldus in 1994. A few years later, in 1998., PageMaker lost almost the complete market by QuarkXPress that was the most popular program for Desktop Publishing. To make things more interesting, the company Quark offered to buy Adobe, but Adobe refused that offer and continued with the development of the PageMaker.
 Icons are those cute little pictures on your Windows desktop that help you identify a program or file. You can easily make your own icons by using MS Paint, Photoshop, or any other mainstream graphics program. Here's how...
 A Favicon is a multi-resolution image included on nearly all professional developed sites. The Favicon allows the webmaster to further promote their site, and to create a more customized appearance within a visitor's browser. Often, the Favicon reflects the look and feel of the web site or the organizations logo.
 This tutorial will step by step take you through creating a simple tiled background with Adobe Photoshop.
  Greenshot is a great program that does its job perfectly. For every stated option in the menu there exists a corresponding shortcut, so the button 'PrintScreen' will turn on the saving of a region, 'Shift+PrintScreen' captures the last selected part, 'Alt+PrintScreen' saves the active window and 'Ctrl+PrintScreen' the whole screen.
 What is Adobe PhotoShop?
Adobe Photo Shop is a leading paint program from Adobe systems, Inc that allows you to create rough freehand drawings. The images are stored as bit and can easily be edited.
Adobe Photoshop is a powerful Imaging utility used by professional and amateur graphic designers. It is used for digital photo enhancement, composition, and retouching.
With the popularity of the web, came the popularity of web graphics. Adobe Photoshop is the prime utility in producing most of graphics seen on the Internet. It is also used in the professional world to create logos and designs. Initially, it ran only on which was a strong selling point for Macs, especially among graphic artists. Today, Photoshop runs on both Macs and Windows.
Tips
Speed Up Your Work in Photoshop
Any project that you work on in Photoshop will have some repetition. Certain projects (like creating seamless pattern tiles) will have a lot of repetion. By following the next two steps, you should be able to speed up your work considerably.
First, learn some common keystrokes. It will only take a few minutes, and I promise you won't regret it.
Here are the keystrokes that I use most often. Mac users, substitute the Command key for the Control key:
Ctrl+A Select all
Ctrl+C Copy
Ctrl+V Paste
Ctrl+S Save
Ctrl+D Deselect
Ctrl+Z Undo
Ctrl+U Adjust Hue/Saturation
Ctrl+X Cut (useful for layers)
PrecisePlacementsofGuides
To precisely place a guide, first turn on the rulers by choosing View>Show Rulers, then hold down the shift key when dragging out a ruler... it will snap to the tick marks on the ruler. If you pull out a guide and its pointing in the wrong direction, you can hold Option to switch its orientation (vertical/horizontal). You can also double-click on the rulers to change the measurement system... try using the Percentage setting, then it's easy to place guides at the exact enter of your image.
Flip Image But Not Guides
If you use the Image>Rotate Canvas>Flip Horizontal or Vertical command and don't want your guides to flip with the image, just choose Lock Guides from the View Menu.
Zoom Without Resizing
You can zoom in and out on your image without resizing the document window by typing Option-Command-plus and Option-Command-minus.
Crop Tool Tricks
Hold the Command key to prevent the Crop tool from snapping to the edge of your document. Turn on full screen mode (by typing "F") and then pull the cropping rectangle beyond the edge of your image to add space to your document (it will be filled with the current background color).
CMYK Color in RGB Mode
When using the Color Picker dialog box, you can choose View>Preview>CMYK to see what the colors will look like once your image is converted to CMYK mode. This will only affect the color picker and not your image.
Sorting a Large Number of Images
Have you ever needed to open and sort over a dozen images? Well, Photoshop 5.5 makes that easier... you can Command-click on the name of your document (at the top of the image window) to navigate your hard drive and open a folder. You can also click on the thumbnail icon at the top of the image window and drag it to a folder on your hard drive (or the trash) to move it to a different location on your hard drive. You might need to click and pause for a second before dragging to get this to work.
Set Screen Mode of All Open Images
In Photoshop 5.5, you can Shift-click on the screen mode icons at the bottom of your tool palette to change the screen mode of all open documents!
Switch between open documents
In Photoshop 5.5, you can type Control-Tab to cycle through all open documents!
Even Percentage Zooms
When you click and drag with the zoom tool you will end up with an odd magnification (example: 37.996%), to get to the closest even percentage (50%, 100%, 200%, etc.), just type Command-plus and then Command-minus.
Eliminate Big Data
To discard any information that is extending beyond the edges of your document (known as Big Data), choose Select>All and then choose Image>Crop.
Measurement Tool
When using the Measurement tool, you can Option-drag from the end of the line to create a second line. Then the Info palette will indicate the angle between the two lines.
Lines
You can visually change the width of a line by first creating a very wide line (20 pixels or so), then applying the Filter>Other>Maximum filer.
Magic Wand
To quickly change the tolerance setting of the magic wand tool, press Return, type a new tolerance setting (or just use the up and down arrow keys) and then press Return again. The Magic Wand tool uses the Sample Size setting that is specified in the Eyedropper options palette.
Paintbucket Tricks
You can use the Paintbucket tool as an eraser by double clicking on the tool and then setting its blending mode to Clear. You can also fill all the transparent areas of a layer by setting it's blending mode to behind. The Paintbucket tool usually completely replaces the colors in an image-use the following techniques to change that:Set the blending mode (the little pop-up menu at the upper left of the palette) to Hue to change the basic color of objects. Use Multiply mode to have the color you are filling with combine with the color the is already in that area (good for replacing the color under shadows). Use Difference mode to get wind variations in color that changes depending on the original colors in the image.
Large Brushes
Most of the time large brushes produce unsmooth edges, to prevent this, double-click on a brush and lower its spacing setting to 1%.
Painting Tools
When using the painting tools, you can hold down the shift key and click in multiple places (don't drag) and Photoshop will connect the dots with straight lines. If you hold down the shift key while dragging with the painting tools, Photoshop will constrain your painting to a horizontal or vertical line. To lower the opacity of the current tool just start typing numbers (1=10%, 3=30%, 27=27%, 0=100%, etc.)
Quick Palettes
You can quickly toggle individual palettes on and off using the following keyboard commands: F6=Color Palette, F7=Layers Palette, F8=Info Palette, F9=Actions Palette.
Ruler/Guide Tip
Press Command-R to show the rulers. Then click and drag from the ruler to create a guide. You can also hold down the option key to change the direction of the guide.
Changing the Color Gradient
While using the Color Palette, you can Shift click on the gradient at the bottom of the palette to cycle between RGB Spectrum, CMYK Spectrum, Foreground to Background, and Grayscale Wedge settings, or Control-click to go choose one of these items from a menu.
Pantone Colors
To choose Pantone colors from the Swatches palette, choose Replace Swatches from the palette's side menu and then open the Pantone file. The Pantone file is located in the Photoshop>Goodies>Swatches folder. Now move your cursor over a swatch and the tab at the top of the palette to indicate which Pantone color you are selecting. When choosing a Pantone color from the color picker (click on foreground color and then click custom), you can type numbers to get to a specific color, even though there is no text entry field.
Accurate Print Preview
The Print Size view is almost never accurate. To get an accurate print preview try the following: Choose View>Show Rulers, then open the Navigator palette by choosing Window>Show Navigator. Choose File>Preferences>Units & Rules and set the Rulers pop-up menu to Inches. Now hold a physical ruler up to your screen and move the slider at the bottom of the navigator palette until the ruler on screen matches the ruler you are holding. The percentage that is listed at the bottom of the Navigator palette is what is needed for an accurate Print Size preview for a document with that resolution.
Actions and Document Size
Set your measurement system preference to Percentage (in your preferences) before creating an action to make the action nonspecific for the size of the document being created. That means if you create a selection that is half the width of the document, it will always be half the width regardless of the size of the current document.
Mac: Save Page Setup Settings Option-click the OK button in the page setup dialog box to save the current settings as the defaults. (must be using LaserWriter 8 or later).
Mac: Get out of TroubleIf you ever get an error dialog box that just contains a ">" and nothing else, that's known as a programmers interrupt. To get back to your work, just type "G" and then press Return.
Precise Placement of Lens Flare
Open the Info Palette and set the measurement system to Pixels. Move your cursor over the exact area where you would like the lens flare to appear and write down the numbers in the info palette. Now, choose Filter>Render>Lens Flare and Option-click on the preview image-this will bring up a dialog box allowing you to type in the exact position of the lens flare.
Flatten Images When Converting to CMYK
Most images should be flattened when changing the mode to CMYK. Many blending modes (hardlight, overlay, etc.) do not look good in CMYK mode unless the image was flattened when converting. Any glows that fade to black will look better when flattened in RGB, then converted to CMYK. If you use the Multiply mode, and do not flatten when going to CMYK you can easily create too much ink in an area and create problems on press.
Remove the Background From a Color Logo
Starts with the logo on its own layer (If it's on the background layer, double-click its name and change it). Choose Select-All, then choose Edit-Copy. Add a layermask by clicking on the left most icon at the bottom of the layers palette. Type "" (be sure not to use "/" by mistake), then choose Edit-Paste. Double-click on the layermask icon for the layer your are working on and change its color to an intense color that is not present in the logo and set the opacity to 100%.
Choose Image-Adjust-Levels and use the upper portion of the dialog box to change where the color is displayed. The color is indicating the areas that will be deleted when you are finished. Adjust the image until the color completely covers all background areas, but none of the logo.
Type "" (be sure not to use "/" by mistake), then drag the layermask icon for that layer to the trash and choose Apply when prompted.
If a slight white edge is present when the image is overlaid on top of another, choose Layer>Matting>Remove White Matte, or Layer>Matting>Defringe.
What to Look For in a Scanner
Resolution is usually not the most important feature when purchasing a scanner. To determine the maximum resolution you will ever need, multiply the highest resolution setting you've ever needed by the largest percentage of enlargement you'll need to use. Example: 300PPI resolution x 200% scale=600 If this was the end result of your calculation, you would never need a scanner with a resolution higher than 600.
There are two features that are usually more important than resolution: Bit-depth determines how many shades of gray (or shades of color) the scanner can pick up off the original image. You want to make sure your scanner is 30-bit or above. This allows you to use the controls in your scanner (levels, curves, etc.) without degrading the end result. If you make extreme adjustments with Levels and Curves in Photoshop, your image will appear posterized.
D-max or Dynamic Range determines at what point the scanner will no longer be able to pick up detail in the shadows of an image. The higher the D-max or dynamic range, the more detail you will get out of the shadows. So, if you are comparing two scanners, the one with the higher D-max is usually the better scanner.
Other than these features, look at the software that comes with the scanner. Make sure you feel comfortable with the layout and features because you will be stuck using what comes with the scanner.
Photo in the Shape of Text
Place a photo on a layer directly above some text, then type Command-G (Control-G in Windows). Use the move tool to move the photo around until it looks just right.
Paste an Image Where You Want It
Make a very small selection with any of the selection tools before choosing Edit>Paste. The image you paste will be centered over the selection. If the selection is near the edge of your screen, the image will be pasted all the way against the edge of the document (it moves the image over to avoid clipping off part of the image).
Mac: Hide Current application while switching applicationsHold down the Option key while choosing another application from the upper right menu on the menu bar. This also works with clicking on your desktop pattern to switch to the Finder.
Hide All Palettes Except Current ToolPress Tab, then press Return.
Lower Opacity Of Current LayerSwitch to the move tool by typing "V", then press any number key (1=10% opaque, 5=50% opaque 0=100% opaque).
Designing with type the quick way
One of my favourite text features is the ability to cycle through all current fonts on a selected fond of text. This feature is great for running quick design experiments and finding the right typeface for a project. first select the text you want to change. Then select the name of the font in options bar.finally uses the up and down arrow keys to move through your installed fonts.
Drag and drop styles
This is a very easy way to apply a style to any image. You might thin that you must first select the layer to which you want to apply the style. Simply drag a style from Style palette on top of the targeted layer, and Bingo it's applied. Now for a bonus offer!you hold down the shift key while dragging and droping these styles, you will add the effects to any existing styles on that layer. The new style will always override any similar effects that may be in conflict.
Global Types changes made easy
Sometime it is nice to change the type of several text layers at the same time. Here is a great technique for doing so. First make sure that all text layers you want are linked from within the layers palette. Then select one of the text layers in this group of linked layers. Choose the text tool from the Tool palette. Now for holding down the shift key. Change the font for the text from the opinion bar. WOW, you get a global text change across your document.
Get Info!(Mac only)!
Ever wanted to know little more about a file you have saved, but donot want Adobe Photo shop to check it out. On the Macintosh you select a file from the folder and then choose file > Get Info > General Information. You will notice that Adobe Photoshop has saved some detailed file information about the image in this dialog box.
Quick Slide Shows
Want to create a quick slide show from a group of images? Here is how to do it. Open several of your images and stack them in a viewing order. Now hold the shift key and click full screen mode in the Tool palette.(this button is third from right, just below the quick mask button).Using the shift key will display all open images in full screen mode. Now to start your show, simply press Control +Tab each time you want to cycle your next image.
Change your preferences the easy way
If you tend to work with different preferences during your work day or you work on a shared machine where each user changes preferences, then this tip is for you. In Photoshop 6.0 you can set an action to set preferences. I first start all my preferences set to their defaults and then I create a new action and start recording. Next I open my preference settings and make all changes I want. Then I stop the recording, name the action and assign it a function key. Just be sure to save this preference action as a backup that you can easily play I your preferences have been changed.
Saving Liquefy Distortation Settings
You can save the distortation adjustments you make while in the Liquifty Box and use them again for other layers. After distorting the image press the shift key when you click Ok in the Liquify dialog Box.You have now saved the distoration matrix to a temporary file. To use these settings again, select another layer and choose Image > Liquefy while holding the shift key until the Liquefy dialog box appears. Your most recently used adjustments will be applied to the new image found this trick useful for applying the same distortation to multiple layers across a document.